Author:

Some suggestions

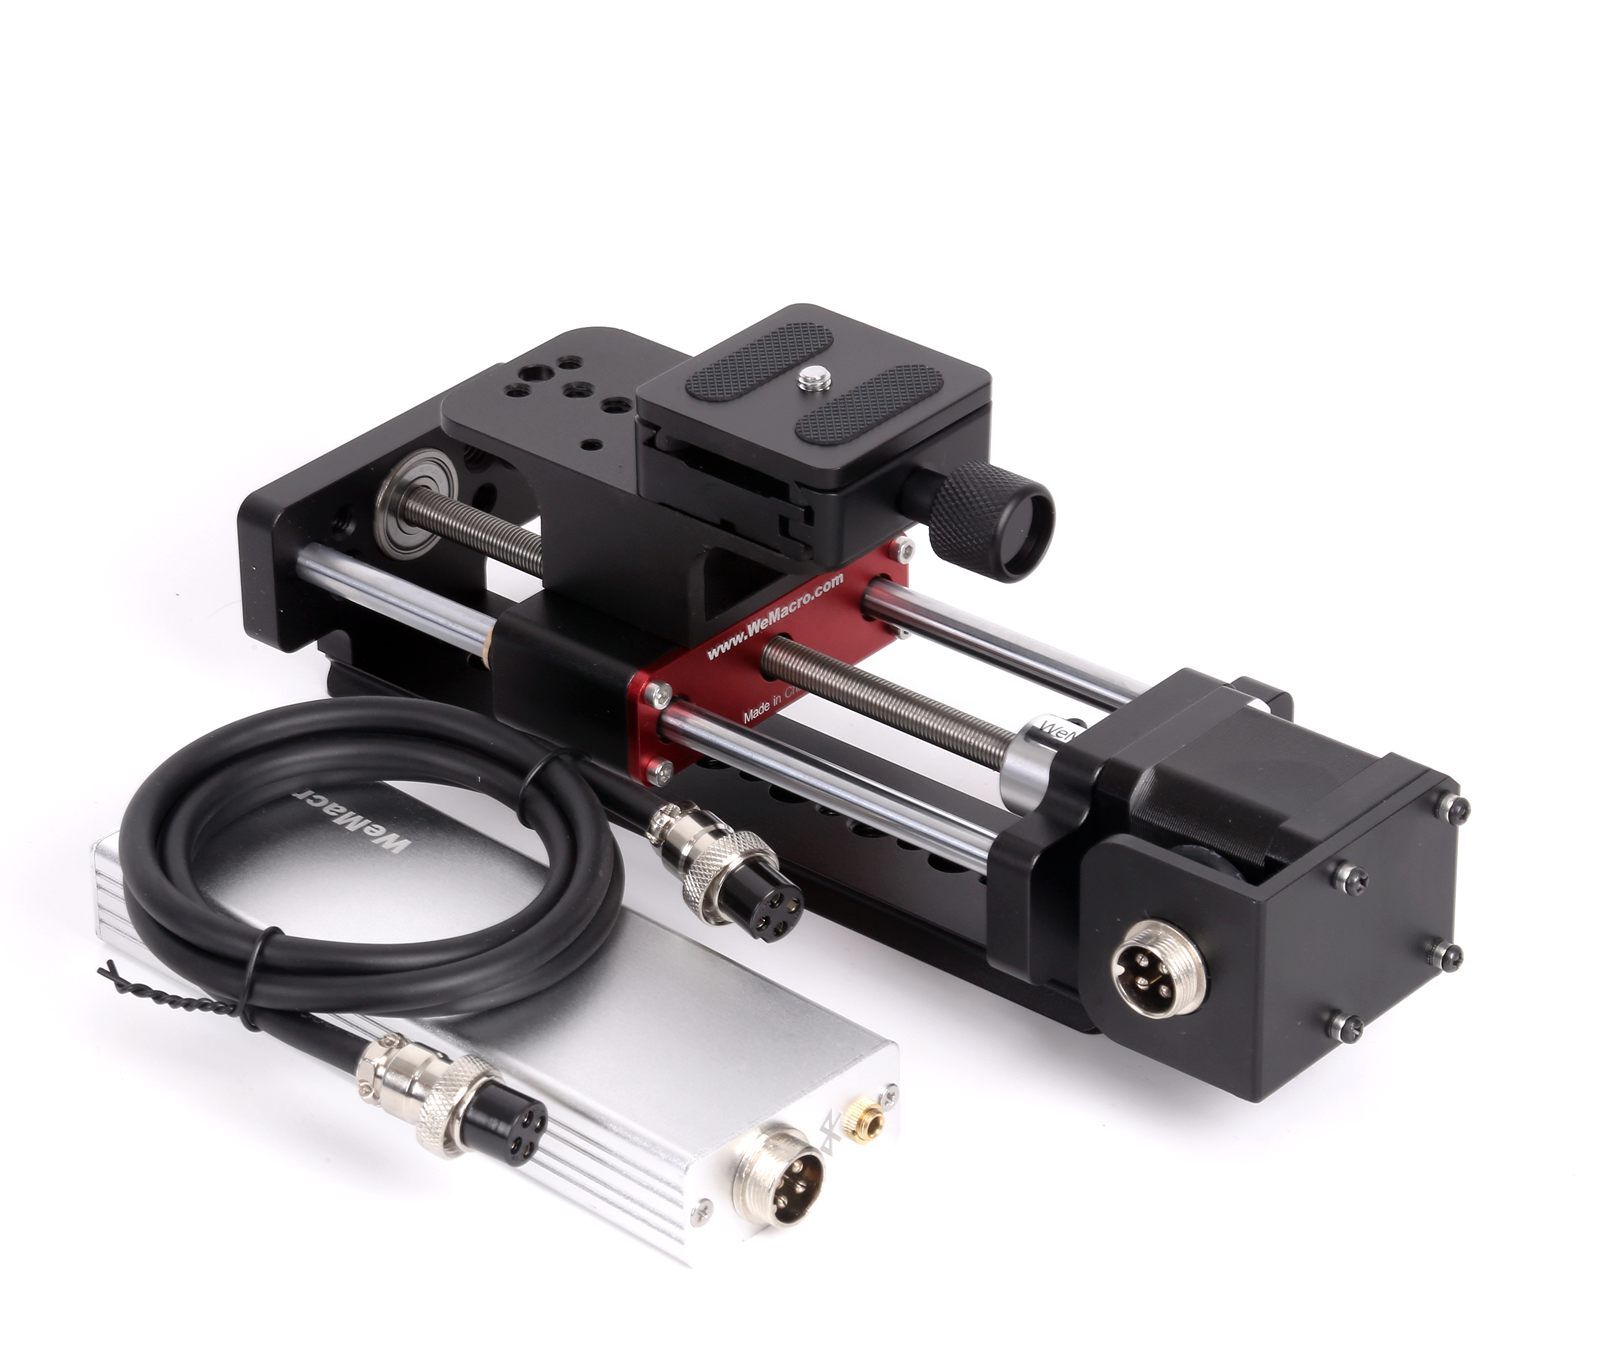
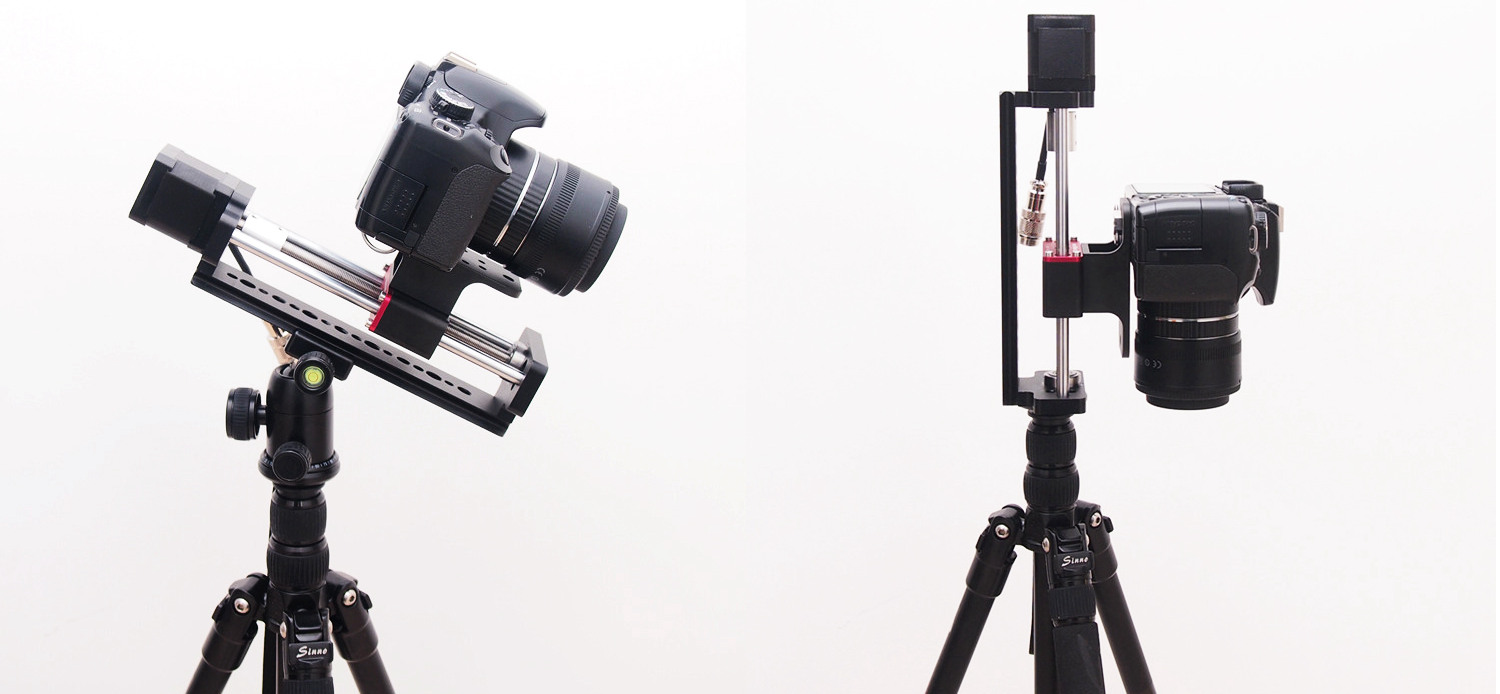
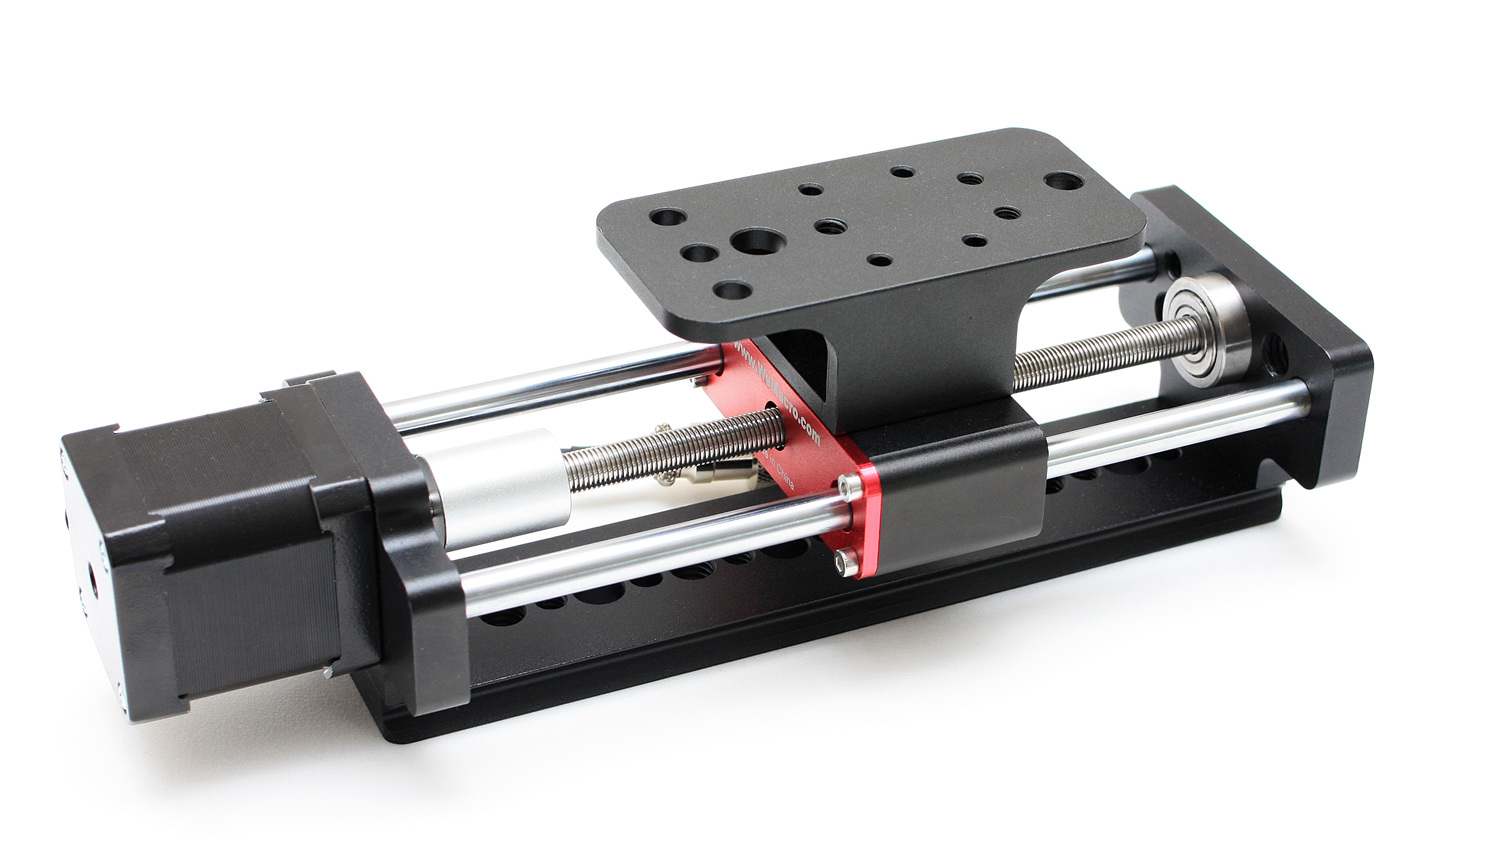
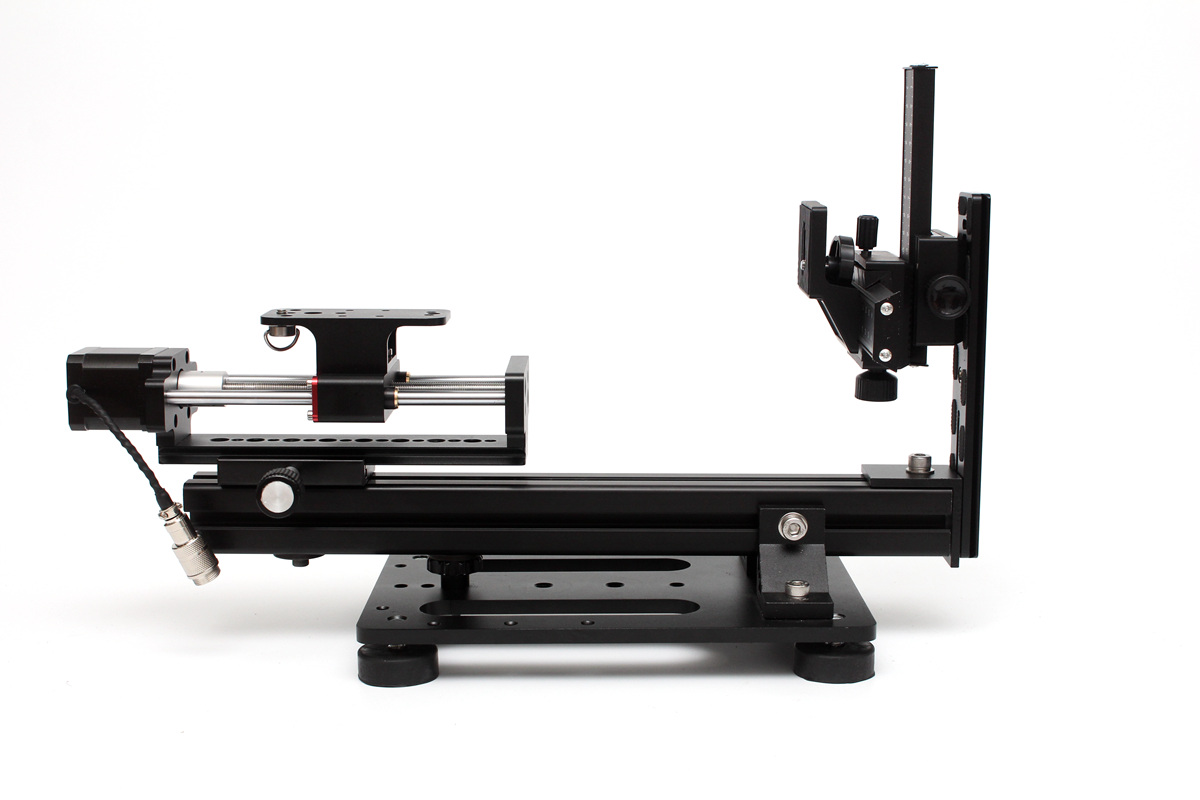
1 How to fix the WeMacro rail.

Please consider our Vertical stand which can save space on the desk and can also work in horizontal position.

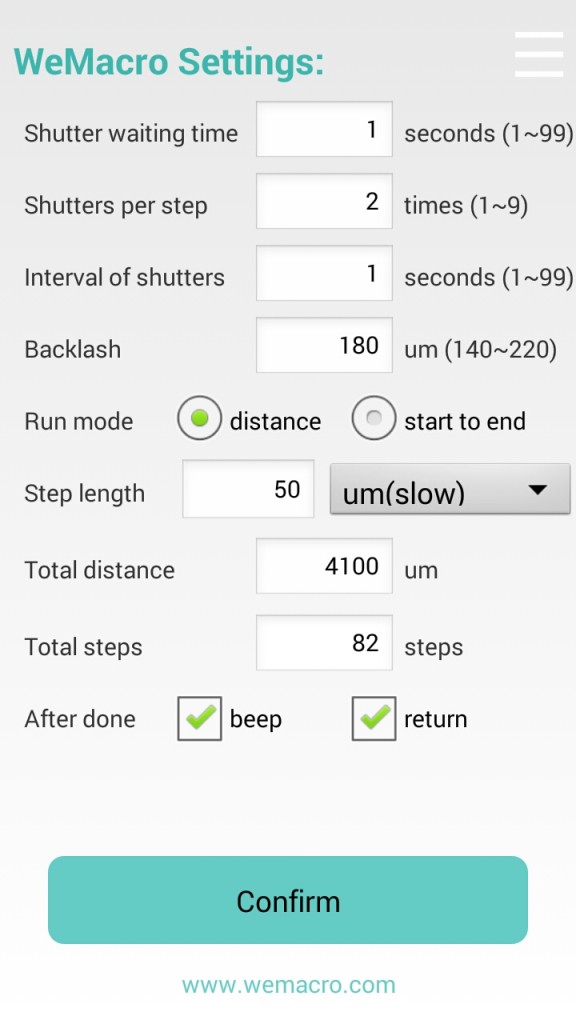
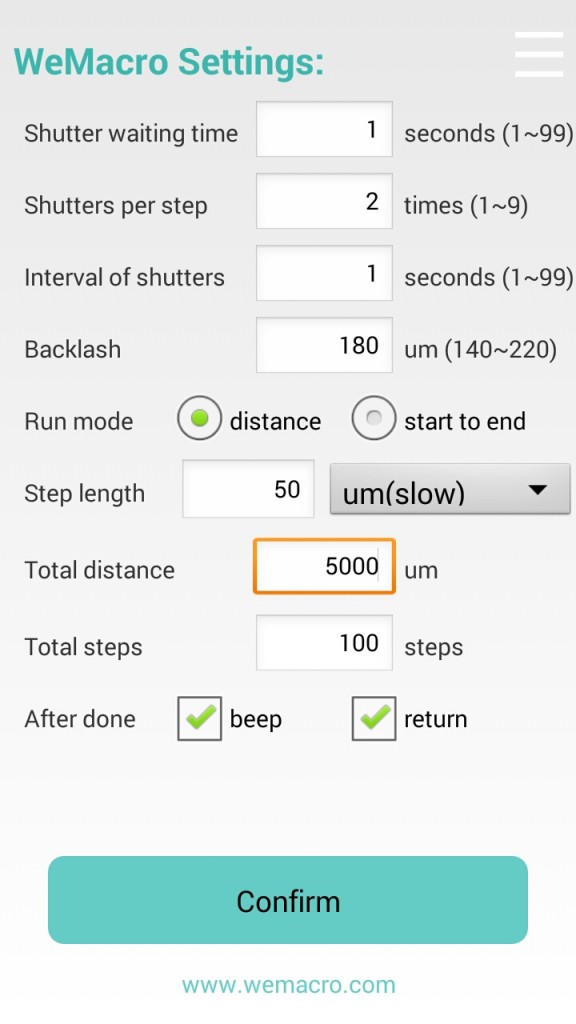
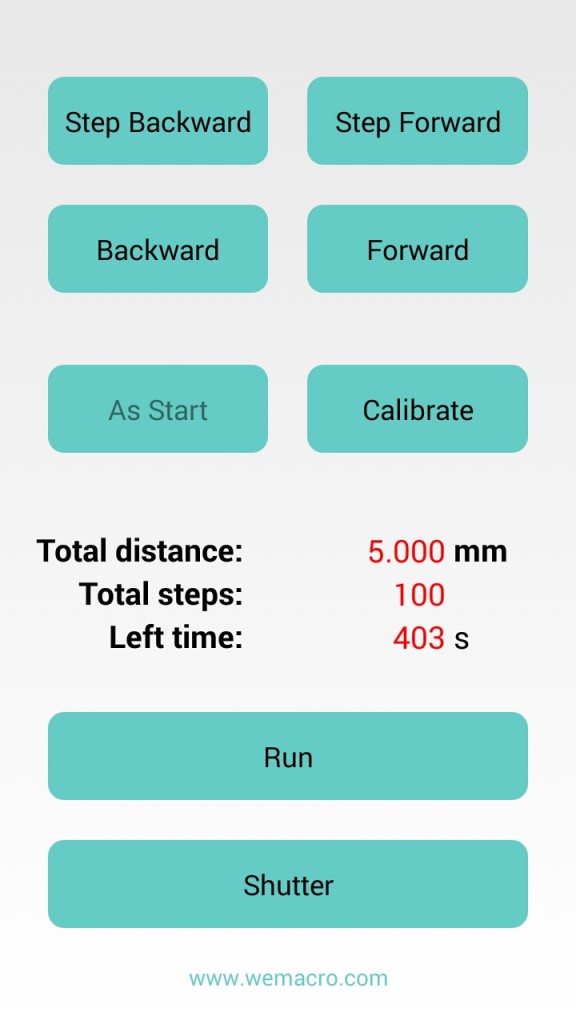
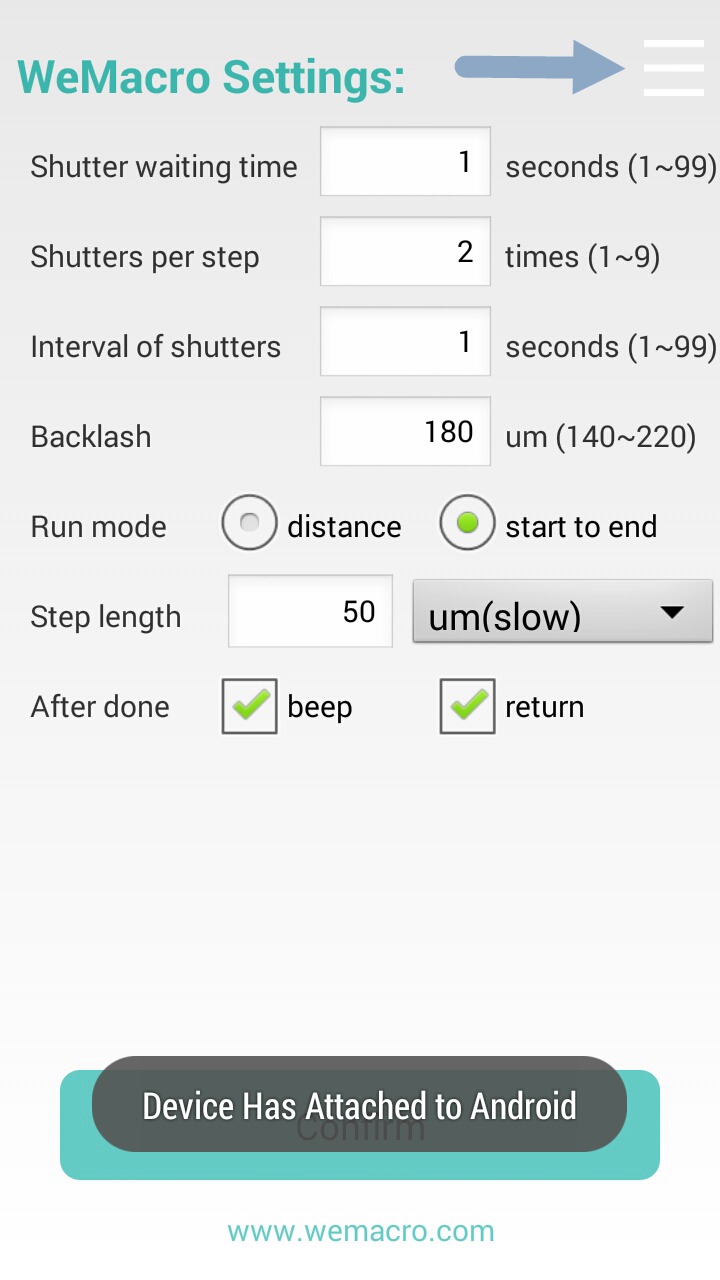
2 What ‘s the difference about 2 mode

It’s my personal opinion that.Below 5X or 5X  magnification,you can use from start to end mode.It’s quite  intuitive.But if shoot in bigger magnification,it will be better working in distance mode.Such as 20X for butterfly wing scales.You can move the rail forward to get close to the beginning point.Then set a distance to run.At the end of shooting,if you are not sure whether the distance is enough for the whole range,and you do not know what the last picture status is,you can simply press “shutter” to shoot one more picture to check.Also it’s better changing parameters on the camera by cable or wireless instead of operating on the camera.

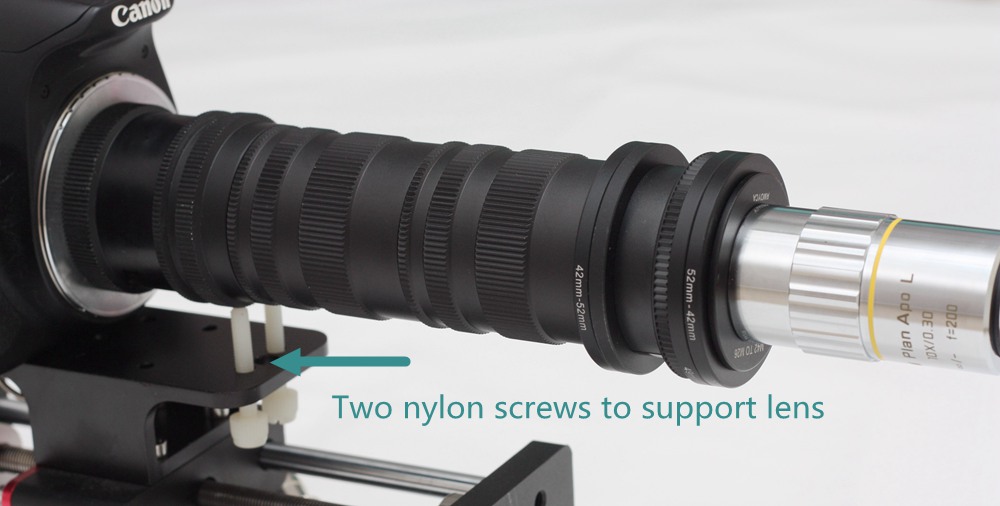
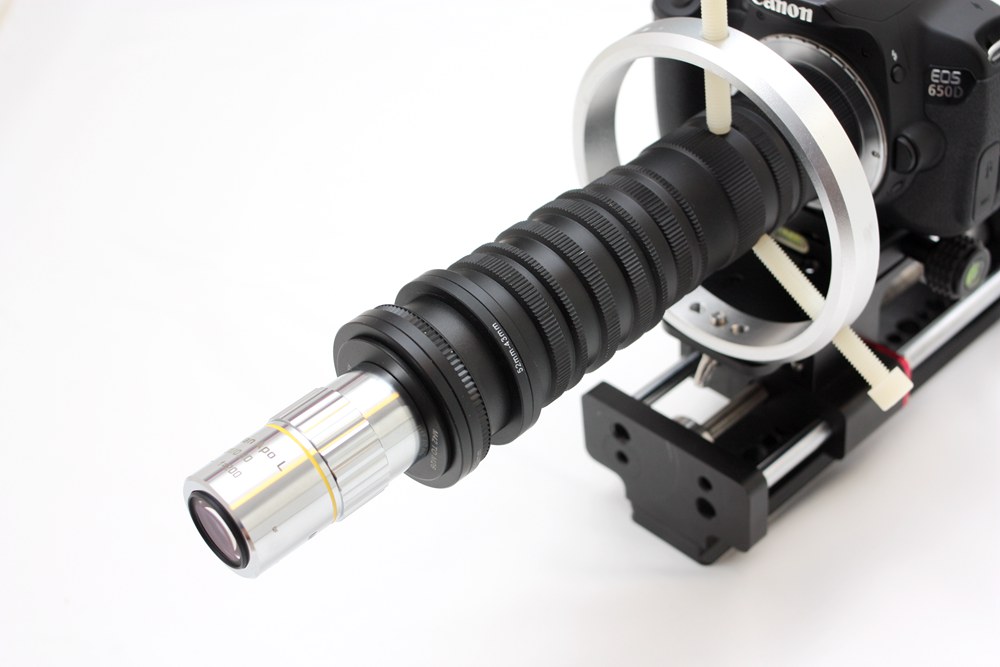
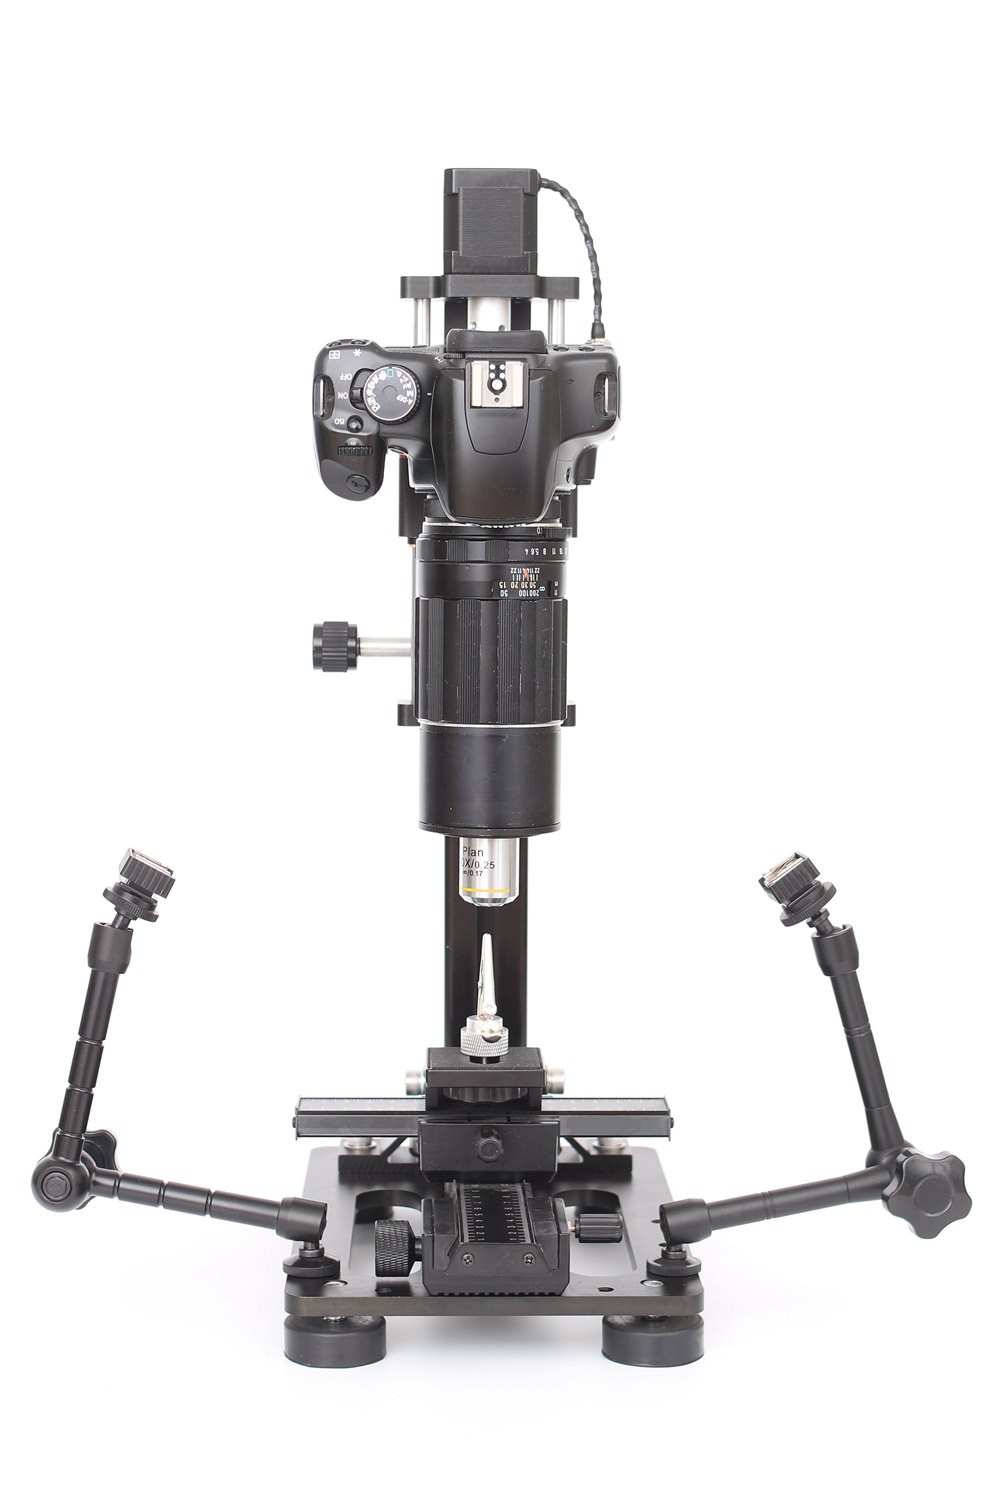
3 When I should use lens support

The are two methods to support lens.Nylon blot and ring support. These work when you shoot in continuous light.They can help to reduce the shake caused by the mirror.By using this method,you can reduce 3-5 seconds to stable  the picture.It can save a lot of time when a stack contain over 100 pictures.

4 How to make a dedicated WeMacro controller by wire

Useful weblink

1,http://extreme-macro.co.uk/

By Johan J Ingles-Le Nobel .It’s very useful website for  macro photography professionals or amateurs.And thanks to Johan,he reviewed our rail as well.

http://extreme-macro.co.uk/wemacro-rail/

(The software will be upgraded soon in these weeks.Auto mode will be add in control soon).

2,http://www.microscopyu.com/articles/formulas/formulasfielddepth.html

DOF about some Nikon objective lens.You can set step length smaller than DOF of objective lens.

3,https://expertphotography.com/20-tips-shallow-depth-of-field/

What Is Shallow Depth of Field(by Jenn Mishra from expertphotography.com)

Control by iOS/Android phones

We strongly recommend to use iphone or android to control the rail,it ‘s easier and more  intuitive.Android ‘s apk can be found in our download page and iOS app can be found in App store now.Please search”WeMacro”in app store.

The control box we are shipping now is only one type,bluetooth version.It can be controlled by1, Windows PC though usb cable

2, Bluetooth 4.0 on phone(Android and iOS).

3, Bluetooth and USB on MacOS

Bluetooth control

(almost same,but it show clearly how the rail work) It almost same in iOS app.Search “WeMacro”in app store you will find it.

iOS device at least ipad 3 or iphone 4S which has bluetooth 4.0.

The difference is in iOS app ,the parameters save end with ***.wm. No  limits of lens of parameters number.It can not be deleted once you make a **.wm file in iOS folder, but it can be changed.

Bluetooth version connection:Stay close to the control box  within 2 meters.Open the app in the phone then wait about 5 seconds,the app will show “Remote device connected”.If the app do not show this message,you can slide to second page then slide back to first page of app.Wait about 5 seconds the message should appear.Before open the app,please make sure you are not running this app in background already. (Sometimes  you need restart Bluetooth function on phone  if it can’t connect first time.Detail process as below:

1, Disable the bluetooth on the phone, then restart it.  Quit wemacro program in background (Please be sure you had installed the bluetooth version of apk).

2, Turn on the control box. Then turn on the app on the phone. Stay close with the control box within 1 meter.

Wait for about 5 seconds it will show device was connected. If does not, slide to next page of app then silde back to the first page and wait for few seconds. It will connect to the control box again.

)
1You can press the area where the arrow point at.To load or save settings in your phone’s SD card. As below:

Screenshot_2016-07-12-22-24-02
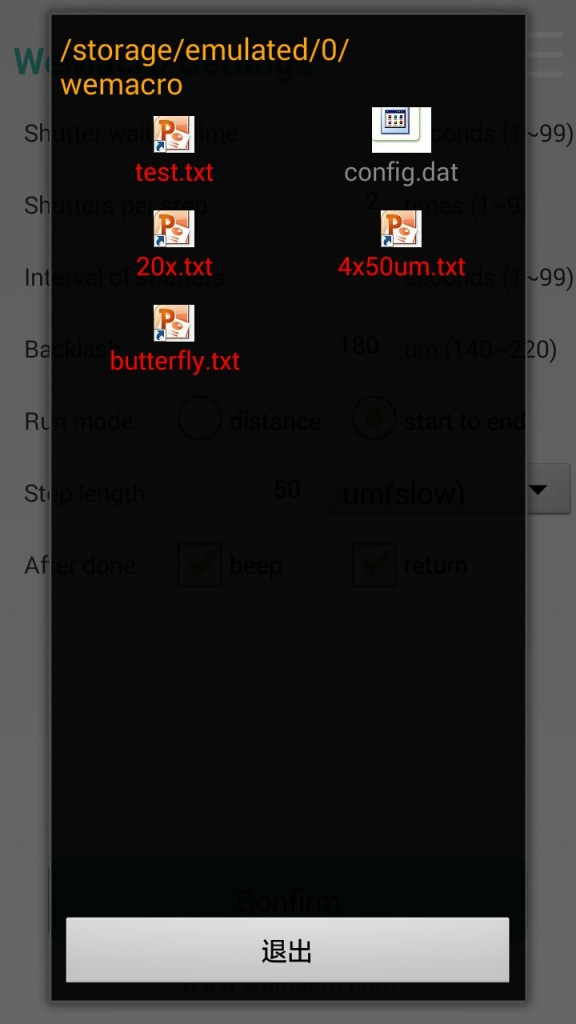
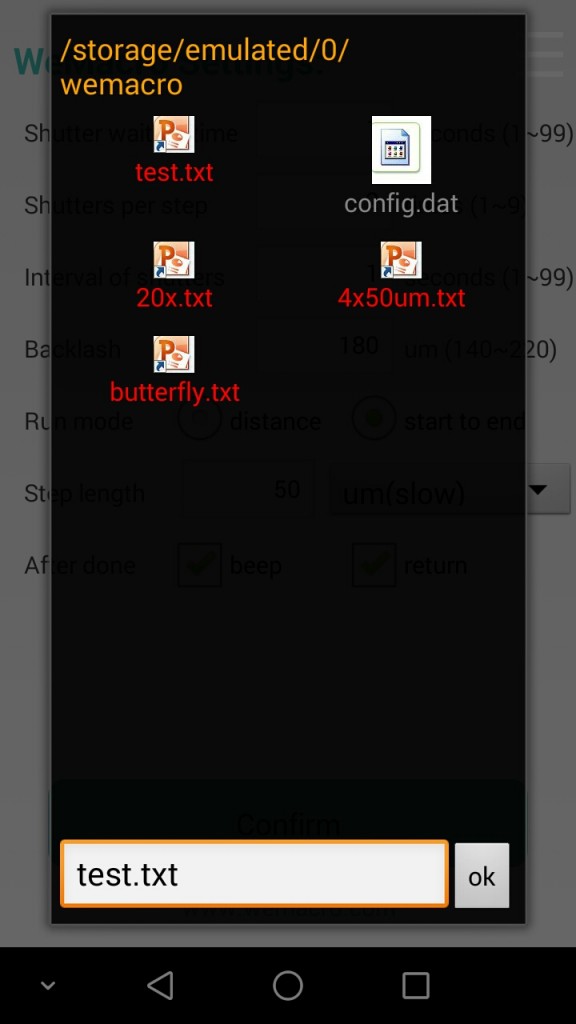
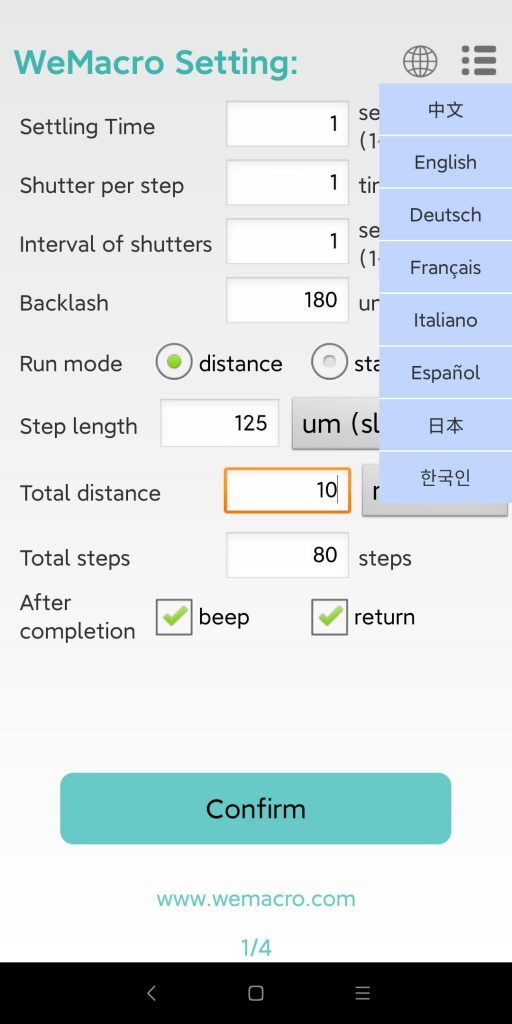
You can save or load setting in WeMacro‘s directory.Screenshot_2016-07-12-22-25-58

The setting file should name as ABC.txt.

Screenshot_2016-07-12-22-26-37

You can set backlash for compensation in this apk now.The value is around 180 micron for new rail.

We offer 2 mode in this APK

1 distance mode :Means you can input the total distance  you want to move and single step length.The program will calculate how many steps it will take automatically.If you change single step length,the step number will change accordingly.

Press “confirm”to save setting to control box.

Screenshot_2016-07-12-22-27-05

You can see steps number changed after typing new distance.
Screenshot_2016-07-12-22-27-21

After pressing “confirm”,you can slide to next page.(1000um=1mm)

In second page,you can step forward,or go backward to adjust position.

If you tick off go back after running,you can press “calibrate”to compensate backlash after the rail stop.

dis page2

When the rail is running, the “run” button will show as “STOP”. If it be pressed, the rail will stop.

The ”stop” button need to be pressed to switch to ”run” when it finish running.

Mode: Start to End

Means you can set starting position and ending position,step length.The rail will run automatically.Press confirm after setting the first page.

In second page you can adjust the position to close to the starting point.If you feel too slow to adjust in micron mode,you can return to first page,swtich to mm mode.But please remember to change back before fine adjustment.To get better accuracy,if you press backward or stepbackward in adjusting positon,please make forward or stepforward,length should be longer than 180um,about 1/4 rotation.So we suggest slowly go forward or step forward  to approach the starting point.You view it on camera’s LCD or by using EOS utility,helicon remote or nikon camera control pro on PC.But remember to turn off live view on camera or PC software,before start shooting.

Press “As start”to set starting point.Then press step forward or forward to find the ending point.Forward direction only!

When the rail arrive ending point,please press “As end”the rail will go back to starting point you just set.Please remember to press “calibrate” before running.

How many steps and how long time it will take will be indicated on second page.

“Calibrate”button will be activated if you tick off return after done.It should be pressed before you rerun.

Meanwhile,if you need stop in running or run again,the usb cable or bluetooth should be keep connecting.

When the rail is running, the “run” button will show as “STOP”. If it be pressed, the rail will stop.

The ”stop” button need to be pressed to switch to ”run” when it finish running.

Notice:The shutter signal may not work if you are controlling the camera through a USB cable on PC by camera software such as Canon’s EOS utility or Nikon’s CameraControlPro.Turn off live view function in software can make trigger signal from control box works.Also set the camera at M mode and the lens is MF mode too.

Download

1, Control program download

Windows Android MacOS iOS
Basic control program, recommended to start with this version.download 

Control and installation instructions visit page

How to work with the camera without shutter cable in windows system :Demo Video download


The latest APK download  for Android 13

You need to authorize app”allow all files access” and turn on Bluetooth and GPS location services after installation

Mac OS download

This program  work with Mac’s USB port and Bluetooth connection.

After downloading, you need to allow the installation of the program in “security and privacy”.

Please search “wemacro”in  Apple app store.Support 8 languages.

Or visit the Link in iOS app store.

Support 8 languages, built-in step size calculator

Or search”WeMacro”in Google play store.

Support 8 languages, built-in step size calculator

WeMacro 5.0

It is more complicated to use than basic, but has more functions.DoF tools for step size build in.

The virtual mouse function can be used to control other CMOS camera software.


Legacy version for Android 10  APP download
Legacy version  Android 9 download

Extract Tool

7-zip or RAR File Open Knife

Or “Breezip”in windows system store

Extract the whole wemacro folder to your computer.Double click wemacro.exe to run.

Notice:Some firewall software may ban the installation of driver or control,you can add them into trust list. Press “F4” to swtich language.(chinese and english)


2 Driver for controller

Windows MacOS
Earlier than 2019 the control box is CH340 chip download download
Later than 2019 the control box is FT232 chip download

Please choose “setup executable”link

Visit this page to choose file for your MacOS

If you have a latest MacOS system,such as 10.15 and have issue about installing the driver, please refer to this page.

 If you macOS is later than Mojave (10.14),please try directly use control program without install drive.Apple already build in drivers for CH340 and FT232 in macOS.

Notice:Please DO NOT install D2XX driver when some version Helicon Remote request.It’s not for wemacro controller.


3,Software for stack

Zerene-Stacker 30days trials

Helicon focus 30days trials

PICOLAY (FREE)


4,Manual download

Quick Guide Manual v1.9 (english)

Manual in German v1.5( Thanks to Olaf Craasmann )


WeMacro’s automatic focus stacking rail,Solution from studio to field photography

WeMacro’s automatic focus stacking rail has total travel length of 100 mm. It’s minimum step can be set as 1 micron in precise mode. The rail is fully controlled by a computer, or a phone by using Bluetooth. Please search “WeMacro” in Google play store and Apple app store.The most recent update added support for up to eight languages and added a DoF calculation tool in Macro photography.The DoF calculation tool is free to use and welcome to download!


Make focus stacking easier and more efficient!

Let you enjoy  focus stacking!

about focus stacking

Focus stacking, also known as focal plane merging, z-stacking, or focus blending, is a digital image processing technique that combines multiple images captured at different focal distances to produce a greater depth of field (DOF) than any of the individual source images. Focus stacking can be used in any situation where individual images have an undesirably shallow depth of field, with macro photography and optical microscopy being two typical examples.

There are various focus stacking software options available, and Adobe Photoshop and Digital Photo Professional also provides focus stacking capabilities.

Zerene-Stacker trial 30days  download 
Helicon focus trial 30days  download
Picolay Free download

What we do

Usually,when we take focus stacking pictures,screwing the macro rail or micrometer(used in high magnification) by hand are popular in focus stacking photograph.

But it’s hard to get precise step length and sometime it’s boring if there are a lot of steps.

WeMacro automatic focus stacking rail can free you from manual works with high efficiency.
step3

https://youtu.be/-HShG_e6-AU

Butterfly wing scale test
objective lens :Nikon BDplan 10X and 40X
camera:Sony NEX C3
10X: step length 6 micron
40X: step length 1 micron

Theoretical value when you set 1 micron as a step it will be 0.9375 micron.It will help in high magnification.

https://youtu.be/zFANHEPImqw

Spec and update info

basic-pack

STANDARD PACKAGE PARTS LIST

1,shutter extension cable;   2,control box;  3,1/4 inch screw(The current version with 1/4″ screws is the version that uses a hexagonal spanner and is already fitted to the rail); 4,stepper motor cable;  5,the rail;  6,power supply(depending on customer choose);  7,shutter cables(depending on customer choose); 8,USB cable 9; Specimen holder  10;2 nylon blot(is a lite version of “ring support” to support lens);11,quick release clamp

(9-11 not on this picture)

Product Name WeMacro focus stacking rail
Camera support Nikon,Canon,etc
Demension length 250 mm, width 80 mm, height 81 mm
Rail weight about 1.3 Kg
Total travel length 100 mm
 Minimum step 1 micron (single direction)
 Backlash 220 micron(recommend value setting in software)
 Speed two (fast in millimeter mode ,slow in micron mode)
 Operating system Win XP,Vista, Win 7,Win 8,Win 10 ,Win 11( VC runtime library supported)Android phone with Bluetooth 4.0 (app is available in Google Play store. Please search”WeMacro”)

iphone (app is available in APP store. Please search”WeMacro”)

iMac MacOS

 Back to start support
 Beep after finish support
 Shutter output 3.5 mm(Before 2021.3.17th it’s 2.5mm)
 Power supply 12V , 2A (global support)

Working current :about 0.3 amp in micron

Idle current:about 0.3 amp in micron

Coarse adjustment current in mm unit mode:about 0.8 amp

 Vertical load 3kg
Horizontal load 5kg
 Communication cable USB B-type,1.5m
 Shutter output 3.5 mm
 Total package weight about 2.1 Kg


Hardware installation

1,Install the camera on the rail by using 1/4 inch screw.

install1

install2

2,Install the rail on a tripod by using the screw hole in the rail bottom.There are 4 kinds of holes in bottom, 1/4 inch screw holes, 3/8 inch screw hole, 6.5 mm diameter and 10 mm diameter hole.Each kind of hole has four positions.

3,Connect the shutter extension cable to the control box,shutter cable connect to camera.Then connect these two cable

port1_e

port2_e

4,Connect the USB cable with computer and control box.Connect the stepper motor cable with control box and the rail.Be careful of the direction of the cable’s notch.
wire

The computer will notify that the system find a new hardware.Please install the driver.(microsoft Visual C runtime library support needed)

And we also provide holes at one side of rail to vertical install. 2 of 1/4 inches threaded holes and 3/8 inches threaded holes.If you want take photos on plants seeds or  sands,you can set it vertically.(Notice: The platform  wihich you put sand on it should not connect with the tripod,otherwise the shutter‘s vibration will make the sands moves in shooting. )

Notice:Please avoid running the platform to both rail’s edge . If it jams at the edge,turn off the power first,then rotate the  coupling by hand(counter-clockwise at motor side,clockwise at front side,look from motor side).

Diagram of cable connection (usb cable connect to PC if it‘s controlled by computer. )

install-demo


all install bs

brief_s

side


A little upgrade about how we install 1/4 inch bolt.Make it easier to install the camera since 2016 June.

IMG_0630

In front of the plate,there are two M5 thread hole,user can use 2 M5 nylon screws to support the lens.It will help to reduce the time of vibration which caused by mirror.The vibration will be obvious when the magnification is higher than 5X and the light is continuous light.

raynox-tube-lens-support

There is an optional parts, Ring support, which can reduce mirror’s vibration a lot.It will supply in the store.

ring


There are 4 types of holes in the rail bottom:1/4 inches threaded hole;3/8 inches threaded hole;10 mm diameter hole;6.5 mm diameter hole.Each of them have 4.

bottom